


 5/20/2012 09:29:00 PM
 Unknown

Showing posts with label camera. Show all posts
Showing posts with label camera. Show all posts
Sunday, May 20
Wednesday, January 4
The new X...
I think...
I think it will be interesting to see this on market soon...
I really hope... but I really hope to own this... apart from X100 and X10 recent release by Fujifilm.
Anyway, I was browsing my Google reader earlier on, and I saw this article from Petapixel and I was overwhelming upon seeing this cam. Mirrorless cam from Fujifilm - X1. I cannot wait for more information in the later date tho!
I think it will be interesting to see this on market soon...
 |
| Via Petalpixel |
I really hope... but I really hope to own this... apart from X100 and X10 recent release by Fujifilm.
Anyway, I was browsing my Google reader earlier on, and I saw this article from Petapixel and I was overwhelming upon seeing this cam. Mirrorless cam from Fujifilm - X1. I cannot wait for more information in the later date tho!
Wednesday, December 1
Time to go, my long old batteries...
Good bye to my old batteries that lie in my dry cabinet for years. It is time to clear them off for new one.
I still remember I bought a lot of Sanyo batteries when I first started photography. Then, I am using PowerEX and finally, I chose Sanyo Eneloop.
I am going to ditch my PowerEX batteries as their lifespan had reach to their destination. I do not want to face another powerless shot from my external flash. That's cold sweat!

Byebye to you!

Goodbye Sanyo... you are way old

Goodbye Old Sony Batteries
I still remember I bought a lot of Sanyo batteries when I first started photography. Then, I am using PowerEX and finally, I chose Sanyo Eneloop.
I am going to ditch my PowerEX batteries as their lifespan had reach to their destination. I do not want to face another powerless shot from my external flash. That's cold sweat!
Byebye to you!
Goodbye Sanyo... you are way old
Goodbye Old Sony Batteries
Monday, November 29
It is fun and nice to meet your ex coll in banquet after so many months/years. It is great to catch up one another tho.
I am truly happy when seeing them during Sandy's wedding.
I am also glad that the video I did for them receive a lot of positive comments too. It is a rush job for her within 1.5 months! I am totally stressed out and push back a lot of my jobs which result me being so tired everyday because I have not give my client the final product!
All in all, I am currently 70% completed. Another processing of photo job will commence real soon.
Anyway, here's my ex coll from IFP (Inflight Productions, Singapore)


Meet my ex senior audio producer who always love to talk rot with me! We basically chat anything!

Oh yes, my ex audio manager (left) and audio producer (right)
1 banquet should be enough and I often laughed at people who attending 2 within a day!
That actually happened to me on 13th Nov!
Noon - my ex coll at Furama Riverfront Hotel
Night - my photography buddy at Hilton
Wow, I ate a lot. Better to make myself work out harder! Ha!
Here's the pic during the 2nd banquet at night. yah, 2 photos in all. Enough? I bet so!


I do not mind a Nikon camera. Really! =)
I am truly happy when seeing them during Sandy's wedding.
I am also glad that the video I did for them receive a lot of positive comments too. It is a rush job for her within 1.5 months! I am totally stressed out and push back a lot of my jobs which result me being so tired everyday because I have not give my client the final product!
All in all, I am currently 70% completed. Another processing of photo job will commence real soon.
Anyway, here's my ex coll from IFP (Inflight Productions, Singapore)
Meet my ex senior audio producer who always love to talk rot with me! We basically chat anything!
Oh yes, my ex audio manager (left) and audio producer (right)
1 banquet should be enough and I often laughed at people who attending 2 within a day!
That actually happened to me on 13th Nov!
Noon - my ex coll at Furama Riverfront Hotel
Night - my photography buddy at Hilton
Wow, I ate a lot. Better to make myself work out harder! Ha!
Here's the pic during the 2nd banquet at night. yah, 2 photos in all. Enough? I bet so!
I do not mind a Nikon camera. Really! =)
Wednesday, October 27
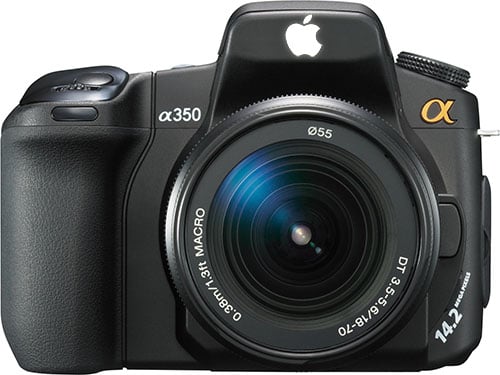
Will this be the next generation of DSLR?
Omg, an Apple Alpha DSLR? How cool will there be?
Will this going to be the next generation of DSLR?
Maybe, I say maybe, they will use the iOS for the camera and you are able to sync the apps and play! How cool? Imagine hipsmatic apps on the DSLR?
Ok, joke aside. This is just a rumor whether they will make it works.
More info
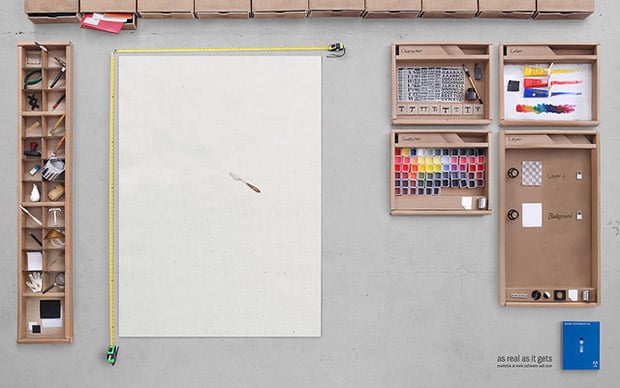
The Creativity
Well, I actually love to see people with such an interesting creativity doing Photoshop layout.
In this case, presenting you the Real Life Photoshop.
More info
War and Debate. Let's just stop it
While looking through my RSS feed, I find this topic very interesting. Hence, sharing with you.
The war and debate of both camera should just come to an end. Remember, there are strong supporters to individual camera make.
One might slam and other will defend. What's the whole point after all? Let's just do it right and enjoy snapping away.
Also, you got to tell yourself this. You, as a photographer can make wonders, not the make of the camera. A camera job is to capture the moment you wanted for. What more do you want?
There maybe slight differences between cameras, but does that occur you at all? Unless you are doing large format print, yes, I agreed.
Above is my own opinion, but I suggest to read more by Scott Bourne.
Will that ruin a Wedding?
After all, a wedding is all about happy and romantic. The relationship between the videographer and photographer are almost like them. You got to give and take during the filming and snapping. Working hand in hand is important.
End of the day, both parties shake hand, pass name card to each other and say good bye with a smile on the face. You never know if any party will call up and request for service since both had a pleasant working relationship previously.
If problem arise, let's talk and give way.
Unless you are the kind that will.....
Let's just watch the video after this
 |
| via PetaPixel |
Omg, an Apple Alpha DSLR? How cool will there be?
Will this going to be the next generation of DSLR?
Maybe, I say maybe, they will use the iOS for the camera and you are able to sync the apps and play! How cool? Imagine hipsmatic apps on the DSLR?
Ok, joke aside. This is just a rumor whether they will make it works.
More info
The Creativity
Well, I actually love to see people with such an interesting creativity doing Photoshop layout.
In this case, presenting you the Real Life Photoshop.
 |
| via PetaPixel |
More info
War and Debate. Let's just stop it
While looking through my RSS feed, I find this topic very interesting. Hence, sharing with you.
The war and debate of both camera should just come to an end. Remember, there are strong supporters to individual camera make.
One might slam and other will defend. What's the whole point after all? Let's just do it right and enjoy snapping away.
Also, you got to tell yourself this. You, as a photographer can make wonders, not the make of the camera. A camera job is to capture the moment you wanted for. What more do you want?
There maybe slight differences between cameras, but does that occur you at all? Unless you are doing large format print, yes, I agreed.
Above is my own opinion, but I suggest to read more by Scott Bourne.
Will that ruin a Wedding?
After all, a wedding is all about happy and romantic. The relationship between the videographer and photographer are almost like them. You got to give and take during the filming and snapping. Working hand in hand is important.
End of the day, both parties shake hand, pass name card to each other and say good bye with a smile on the face. You never know if any party will call up and request for service since both had a pleasant working relationship previously.
If problem arise, let's talk and give way.
Unless you are the kind that will.....
Let's just watch the video after this
Monday, October 18
Assuming might not help at all
Getting yourself prepare for a shoot is important.
First and foremost, understand your equipment well and making sure it is sufficient are one of the top priority.
I personally made a boo boo on myself because I am overly confident and quite slack on equipment checking.
During NS life, we had been told to check everything before we move out. But to ensure it is working, this will be another issue.
Secondly, always test the system!
I am so ashamed of myself for not getting these done up properly!
Everything will be too late by then and remember, as a photographer, your job require to capture the moment and let your client remember that day! If you done a good job, obviously there will be more job opportunity. End of the day, you must maintain close relationship with your client.
I was consider lucky to be quick witted rather than doing it forcefully which might bring disaster to the photo.
After saying so much, you must be wondering what are the main thing I am talking about it.
One of the scenario will be CF card.
Of course, I brought along extra CF card of 8Gb that day.
Although the speed is ultimately slow, but at least you have the backup.
I was arming with 2 cameras but the secondary camera seem to fail on me. I faced this situation before; the battery went flat although charger say likewise.
So I decided to use that camera's CF card as backup instead.
Secondly, AA batteries.
My external flash failed on me because my AA batteries decided to give up. Remember, batteries do have lifespan, try to recondition them once every 3 months and test it! Apparently, I do not have extra AA batteries with me at all, but I am lucky enough to get lucky shot with the flash once!
This is a pay job, unlike a hobby whereby you can pack up, go buy and continue later on.
Such circumstance is not forgivable because I might ruin their moment. Spend a little more on the CF card and batteries so that you are 1 stress less when going for a paid shoot.
Remember, money can be earned so long we work hard.
Just a sharing thought with everyone.
Monday, September 20
Fuji new camera - it is a vintage beauty
According to Canon Rumors which I had subscribed to my RSS, and then link to here, Fuji is going to launch one of the most loving camera!
Presenting you:

Presenting you:
FinePix X100
Just how wonderful is this camera?
Let's look at the spec first:
| Model Name | FinePix X100 |
| Number of effective pixels | 12.3 million pixels |
| CCD Sensor | APS-C CMOS Sensor |
| Storage Media | SD / SDHC / SDXC memory card |
| Lens | High-performance FUJINON lens with Super EBC Coating |
| Focal Length | 23mm, equivalent to 35mm |
| Aperture Range | F2 to F16 |
| Exposure Mode | Programmed auto mode, Aperture priority mode, Shutter priority mode and Manual mode |
| Exposure Compensation | -2.0EV-+2.0EV |
| Shutter Speed | Bulb, 30 sec. to 1/4000 sec. |
| Focus | High-speed contrast AF |
| Optical Viewfinder | 0.5X magnification with approx. 90% frame coverage |
| Electronic Viewfinder | Ultrafine 1,440,000-dot LCD |
| LCD Monitor | 2.8-inch, Colour LCD monitor, approx 460,000 dots |
| Movie Recording | 1280×720 HD with stereo sound |
| Dimensions | 126.5(W) x 74.4(H) x 53.9(D) mm including lens |
And the image!
Oh man... don't you find it that it resemble the older days of the camera? The old Yashica and Nikon! Apparently, I bet this look even nicer than Leica M9.
In terms of look, definitely I will choose this. But for image wise, I have yet to see it. But from the news written, it is made by Fujinon to perfectly match the APS-C custom sensor. There is a newly-developed EXR Processor, which combines all the latest image processing technology Fujifilm has technology built up over the years.
I am very anxious toward this camera which will be commercial release early next year (2011).
Guess the price?
I bet 1K odd! Do not forget, they are using prime F2 lens at 23mm which is equivalent to 35mm. So there is a 1.5 crop factor.
I am very anxious toward this camera which will be commercial release early next year (2011).
Guess the price?
I bet 1K odd! Do not forget, they are using prime F2 lens at 23mm which is equivalent to 35mm. So there is a 1.5 crop factor.
Wednesday, August 18
Interesting interesting.... in-teres-ting
When I started DJ using Technic 1210MK II turntable, I have already knew about the speed as shown in the video below. On Technic turns, there are dots for you to see on the platter. Having the light pop up, adjust the pitch, you will notice different level of dots will stay at the near constant speed.
But, I never knew that this guy really go all out to do something like this. How hilarious and creative, huh!
Applaud, people... applaud..
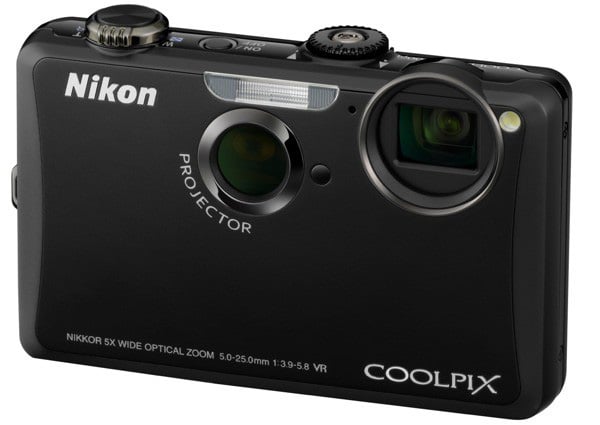
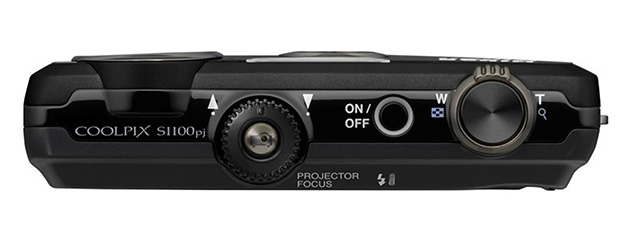
On phone, we can have a lot of interesting on it. Say, wifi, 3G for internet connections, photo taking, video recording, keying appointment, gaming, GPS and many others.
How about a camera? Camera is not just a photo taking tools anymore when HD arrive. Now, most of the camera can at least record HD 720p format. Having a great HD quality does not end here at all. Now, marvelous Nikon evolve with interesting technology: projector on camera with touch screen just like your phone.
Watch the interesting video especially the 2nd one.
Well, it is a good family-point and shoot with multiple function camera! Don't you think so?
via PetaPixel
But, I never knew that this guy really go all out to do something like this. How hilarious and creative, huh!
Applaud, people... applaud..
On phone, we can have a lot of interesting on it. Say, wifi, 3G for internet connections, photo taking, video recording, keying appointment, gaming, GPS and many others.
How about a camera? Camera is not just a photo taking tools anymore when HD arrive. Now, most of the camera can at least record HD 720p format. Having a great HD quality does not end here at all. Now, marvelous Nikon evolve with interesting technology: projector on camera with touch screen just like your phone.
Watch the interesting video especially the 2nd one.
Well, it is a good family-point and shoot with multiple function camera! Don't you think so?
via PetaPixel
Tuesday, April 20
Article from Picture Correct #5
The 5th article which I would like to share with you.

I love RAW because of the dynamic changes you can do on either Lightroom or Photoshop. Remember, RAW files are relatively big, so it is important to have a huge storage. Either you throw your RAW files away or keep it, that's your choice.
RAW file are readable on Ps and lightroom, which, both of them are my favourite tools when come to enhancing of photo.
How about CaptureOne?
It seem almost the same comparing to Ps and LR. What the C1Pro can do before, is what they can do now. Of course, C1Pro is great when you intend to do tether shoot.
If you decided to enhance the photo later on, do remember to save your file as .TIFF and not .jpeg. TIFF allow you to do more and it is lossless while Jpeg, is a lossy and been compressed. Fret not, if you done that so.
Nowadays, you can import Jpeg as it is RAW.
But, whether if there is any loss in quality, sorry, I am not the guru here to explain in details. But I am sure, it might be.I might be wrong.
Take .mp3 of 128kbps to DAW and convert out to .wav. The bitrate is already downgraded... as so to say...
Take .mp3 of 128kbps to DAW and convert out to .wav. The bitrate is already downgraded... as so to say...
Many new cameras now offer the option to save captured photos in the RAW file format. RAW capture brings with it an extra processing step. This step requires converting the RAW image data to a format that is more easily edited with programs such as Photoshop and Photoshop Elements. What you need to explore is the impact that shooting RAW has on digital-only camera characteristics. First, look at the RAW format a little more closely.
shooting raw photography
Photo captured by Tareq AlObaid (Click Image to See More From Tareq AlObaid)
What exactly is in a RAW file?
It is helpful to think of a RAW file as having three distinct part:
Camera data, usually called the EXIF or metadata, including things such as camera model, shutter speed and aperture details, most of which cannot be changed.
Image data which, though recorded by the camera, can be changed in a RAW editing program such as Adobe Camera RAW (ACR) and the settings chosen here directly affect how the picture is processed.
Changeable options include color depth, white balance, saturation, distribution of image tones (contrast), noise reduction and application of sharpness.
The image itself. This is the data drawn directly from the sensor in your camera in a non-interpolated form. For most RAWenabled cameras, this data is supplied with 12 or 16 bits per channel color depth. This provides more colors and tones to play with when editing and enhancing than found in standard 8 bits per channel camera file.
How does this impact on my day-to-day shooting?
Most experienced photographers pride themselves on their ability to control all the functions of their cameras. Often their dexterity extends way beyond the traditional controls such as aperture, shutter speed and focus to ‘digital-only’ features, such as white balance, contrast, sharpness, noise reduction and saturation. For the best imaging results, they regularly manipulate these features to match the camera settings with the scene’s characteristics.
using raw settings in photography
"A Place To Reflect" captured by Tony Taffinder (Click Image to See More From Tony Taffinder)
For instance, a landscape photographer may add contrast, boost saturation and manually adjust the white balance setting of his or her camera when confronted with a misty valley shot early in the morning. In contrast, an avid travel photographer may choose to reduce contrast and saturation and switch to a daylight white balance setting when photographing the floating markets in Thailand on a bright summer’s day. It has long been known that such customization is essential if you want to make the best images possible. However, you must be capturing in a JPEG or TIFF format. As we have already seen, settings such as these, though fixed in capture formats such as TIFF and JPEG, are fully adjustable when shooting RAW.
What does this mean in our day-to-day photography?
All is not lost if after documenting some interiors you accidentally forget to switch the white balance setting from tungsten back to daylight before commencing to photograph outside. The white balance setting used at the time of capture is recorded with the RAW file but is only applied when the picture is processed. This means that when you open the images in a RAW converter, the picture is previewed using the capture setting (tungsten), but you can easily select a different option to process the file. In this example it would mean switching the setting from tungsten back to daylight in the white balance menu of the conversion software. All this happens with no resultant loss in quality. Hooray!
The same condition exists for other digital controls such as contrast, saturation and, with some cameras, sharpness and noise reduction. As before, the settings made at the time of shooting will be used as a basis for initial RAW previews but these are not fixed and can be adjusted during processing. This leads some people to believe that there is no longer any need to pay attention to these shooting factors and so consequently they leave their cameras permanently set to ‘auto everything’ (auto contrast, auto white balance, standard saturation), preferring to fix any problems back at the desktop.
raw photography tips and techniques
Photo captured by Terrence Credlin (Click Image to See More From Terrence Credlin)
Photographers continue to control their cameras on a shot-by-shot basis. Many photographers believe that an image captured with the right settings to start with will save processing time later. Both approaches are valid. Which method suits you will largely get down to a personal preference. It will also boil down to a rechoice of whether you would prefer to spend your time manipulating your camera or computer.
About the Author
Kat S has created a free social network for photographers and artists world wide. Join now or read more free articles online at http://www.newbrightapples.com We offer a free online Photography 101 course. Go to our site now and see for yourself and welcome. You’re on the right course now.


Friday, April 16
Article from Picture Correct #3
I really love the article from PictureCorrect recently hence, instead of being in my email inbox, maybe by posting in my blog will be even better for sharing some general knowledge.
No, I did not master the photos as shown below. But, I have the confident to do so.
Enjoy the article from PictureCorrect!
No, I did not master the photos as shown below. But, I have the confident to do so.
Enjoy the article from PictureCorrect!
Using Color to Create Strong Photo Compositions Posted: 13 Apr 2010 10:49 PM PDT  "Serenity" captured by Johnson Zhang (Click Image to See More From Johnson Zhang) Color is one of the most obvious elements of composition. Everyone knows that intense colors make people take notice of your images. Ever wonder why there are so many sunset and flower shots? Color is the reason. Color has a couple of functions in photographs. First, color grabs the attention of the viewer. Perhaps, because this function of color is so palpable, many photographers miss the more sophisticated, and in some cases far more powerful, function of color: color sets the mood of an image. Since color is such an important compositional ingredient, the experienced photographer will want to use color to its fullest extend — incorporating both functions of color into images. Grabbing the Viewer’s AttentionUtilizing color to grab attention is often rather straight forward. Generally, what is required is a saturated or intense color. This type of color tends to grab the viewer’s attention and focus it on the area of color. Furthermore, the color tends to keep the viewer’s attention for an extended period of time. When the viewer’s eyes do wander, the color tends to bring the attention back. There are a couple of primary ways to use color to grab a viewer’s attention. The first way is to use very saturated, bold colors. An example of this approach would be a dramatic sunset. The second way of using color to grab a viewer’s attention is to use a mix of contrasting colors. An example of this approach would be an image of fall colors where there is a combination of red, orange, and yellow leaves. MoodSetting the mood through the use of color tends to be a more subtle application of color than when color is used to grab the attention. However, that does not mean that it is any less powerful. Different colors elicit different moods. Since there are a huge number of colors, it is not possible to cover all of the colors and their impacts on viewers’ moods in an article such as this one. Instead, a few colors will be reviewed in an effort to convey how colors affect viewers’ feelings.  "Doc" captured by jun dacumos (Click Image to See More From jun dacumos) BlueBlue tends to bring forth feelings of calm or cold depending on how the color is used. This is a reflection of how we perceive the color in nature: the deep calm ocean is blue, peaceful cloudless skies are blue, and large amounts of ice have a blue tint. Therefore, a photographer that wishes to create a feeling of calm in an image should include blue objects in the image such as a peaceful blue stream or a blue lake. GreenGreen often communicates a feeling of lushness and freshness. Again, our feelings about this color are tied up with how we frequently experience that color in nature. We tend to associate green with spring and new growth. Green is frequently used in landscape photography. Green meadows, plants, and fields can be used to convey the mood of a flourishing scene. Yellow, Orange, and RedThe last colors to be evaluated are the warm tones: yellow, orange, and red. These colors are associated with feelings of warmth and comfort (again the colors are tied to how we experience them in nature). Sunsets are a perfect example of how these warm colors create a comfortable feeling. Photographers that wish to take advantage of these colors can include, in their photographs, objects such as flowers, plants, food, and rocks that contain these colors. LightSo far, we have looked at using color to create mood in photographs by means of including objects, with the appropriate colors, in an image. However, there is another way to use color to create mood in an image – the use of light. Early morning and evening provide a photographer with colored light which can be used to powerful effect in images. Before sunrise and about twenty minutes after sunset, everything is bathed in a soft blue light. This light can be used to create a calm mood such as an early morning shot of a beach bathed in the cool, blue light.  "The Oasis" captured by fady (Click Image to See More From fady) Just after sunrise and before sunset, the light is often very warm with red, orange, or yellow hues. This light can be used to create feelings of comfort such as a beautiful mountain peak bathed in a soft, warm, golden light. SummaryWhen properly utilized, color can be one of the most effective methods of conveying mood in an image. About the Author |
Posted: 13 Apr 2010 11:21 AM PDT Milestone Release Celebrates 20 Years of Unrivaled Image Editing and Innovation Adobe Systems Incorporated today announced Adobe Photoshop CS5 and Photoshop CS5 Extended software, must-have releases of the professional industry standard for digital imaging. With millions of users celebrating the product’s 20th anniversary this year, Photoshop CS5 builds upon a rich history of innovation and leadership with groundbreaking features and performance gains that boost creativity and workflow efficiency. Packing in more technological advancements from Adobe Labs than any other release and incorporating enhancements to everyday tasks requested by the Photoshop community, the software has greater intelligence and awareness of the content within images, allowing for complex and magical manipulation in just a few clicks. Adobe Photoshop CS5 Extended delivers everything in Photoshop CS5, as well as advanced tools for 3-D which address the unique needs of the video, Web, medical, manufacturing and engineering industries.  Adobe Photoshop CS5 Photoshop CS5 and Photoshop CS5 Extended will be available as stand-alone applications or key components of the Adobe Creative Suite 5 family.
Redefining the Image-Editing ExperienceNow a native 64-bit application on both Mac and Windows®, Photoshop CS5 delivers superior tools and creative control so users can perform advanced image manipulations and compositing with ease. Revolutionary image intelligence behind Content-Aware Fill magically removes any image detail or object, examines the surroundings and seamlessly fills in the space left behind. Lighting, tone and noise of the surrounding area match perfectly, looking as if the removed content never existed. New Refine Edge makes nearly-impossible image selections possible. This innovative technology precisely detects and masks the trickiest types of edges, such as hair and foliage, while eliminating background color contamination. For photographers, Photoshop CS5 now offers next-generation high dynamic range (HDR) capabilities. When combining multiple exposures into a single HDR image, Photoshop CS5 preserves the full tonal range of a scene with unprecedented speed and accuracy. The new HDR Pro offers exceptional ghost artifact removal and greater tone mapping and adjustment control. With HDR toning, users can emulate the striking look of an HDR image with any single-exposure image. Photoshop CS5 provides revolutionary tools that maximize users’ creative impact. Breakthrough painting capabilities include a Mixer Brush that blends an infinite combination of colors onto a single paintbrush tip, and Bristle Tips that offer lifelike brush strokes. Puppet Warp gives users the power to precisely reposition or warp any image element, such as straightening a bent arm in a photo or manipulating the landscape to generate a new perspective.
Community Involvement Drives EnhancementsIn addition, more than 30 features and enhancements requested directly by the Photoshop community have been added to this release, including automatic image straightening, rule-of-thirds crop tool, color picker and the ability to save 16-bit images as JPEGs. The goal of this engineering effort was to address seemingly minor enhancements that directly impact everyday workflow, but aren’t always at the top of the development list for a new release. A new customizable Adobe Mini Bridge panel is also available directly in the software for faster file browsing and management. Taking 3D and Motion to the Next LevelPhotoshop CS5 Extended includes everything in Photoshop CS5 plus tools for editing 3D and motion-based content. With new Adobe Repoussé technology, users can easily create 3D logos and artwork from any text layer, shape or mask, as well as twist, rotate and extrude designs for different looks. To mirror the realism and appearance of 3D objects, a new materials library offers a breadth of rich options, including chrome, glass and cork. Users can also enhance the appearance of 3D objects by quickly creating shadows with the new shadow catcher. For motion content, tools including paint, text and clone can be used directly over multiple frames of a video sequence with ease using single-key shortcuts. Adobe Photoshop FamilyBuilding upon the 20-year history of Photoshop innovation and leadership, Adobe offers a line of Photoshop solutions for every level of user. Photoshop CS5 and Photoshop CS5 Extended software are at the heart of the Photoshop family, providing unrivaled power and editing freedom. Adobe Photoshop Lightroom® addresses the workflow needs of serious, amateur and professional photographers, helping them find, manage, enhance and showcase images in powerful ways. Adobe Photoshop Elements software provides accessible tools and sharing options for photo enthusiasts. Snap-shooters can quickly and easily share and edit photos with simple gestures using the free Photoshop.com Mobile application on their iPhone or Android™ devices. Photoshop.com completes the Photoshop line providing an online photo sharing, editing and hosting resource for all. Pricing and AvailabilityAdobe Photoshop CS5 and CS5 Extended are scheduled to ship within 30 days with availability through Adobe Authorized Resellers, the Adobe Store and Adobe Direct Sales. Estimated street price for Adobe Photoshop CS5 is US$699 and US$999 for Photoshop CS5 Extended. Upgrade pricing and volume licensing are available. |
Thursday, April 15
Article from Picture Correct #2
Another great article from Picture Correct!
If you are a noob, newbies, amateur... Don't worry! All these are here to help ya! Of course, if you have any simple question to ask, I will be glad to answer them for you. Drop me a msg in my email or twitter.
If you are a noob, newbies, amateur... Don't worry! All these are here to help ya! Of course, if you have any simple question to ask, I will be glad to answer them for you. Drop me a msg in my email or twitter.
Too complicated question will strain my brain, you see. I can help a little, so don't expect me to be like an expert, ok?
Photoshop For Beginners – The 6 Most Important First Steps
Posted: 06 Apr 2010 08:57 PM PDT
Most people want to do special effects with Photoshop but like all tools capable of advanced work, it pays to get the essential basics under your belt first. Here is my recommended list of the 6 basic essentials any Photoshop beginner should learn:
1. Learn the image analysis tools – The Histogram, The Eyedropper, and The Info Palette
These three tools provide you with essential information about your image or photograph. The Histogram will tell you everything you need to know about the exposure of the photograph, whether it is under or over exposed, and the tonal range. The Eyedropper tool will give you valuable information about the colours in the image; especially if there is a colour cast (a colour cast is an undesirable overall dominant colour) you need to correct. The Info palette (or window) will provide numerical feedback when using the eyedropper and also when using other tools. This is an important reference for advanced work so is worth getting to know at the start.
Photoshop for Beginners (Click Image to See In-Depth Video Tutorials)
2. Learn how to straighten a tilted image – Use the ruler to find the angle of tilt
Learning to use the Ruler tool will allow you to determine precisely the angle of a tilted horizon and this can then be used with the Rotate canvas command to rapidly correct a tilted image. No guesswork needed! With so many people using cameras with only viewing screens at the back rather than a proper viewfinder, it has become all to common for pictures to come out of the camera with a severe tilt to them. Learning to use the ruler and rotate canvas combination makes correcting these pictures really easy!
3. Learn to crop the picture – Use the Crop tool
Cropping is the process of removing anything from around the edges of a photo that does not add to the impact of the photo. The Crop tool should be learned next since cropping is a very important creative process. There are very few photos that cannot benefit from being cropped. Too many Photoshop beginners just accept the content of the photo as it came from the camera without thinking about whether the picture can be improved visually by cutting away unnecessary edges. The additional benefit of cropping the picture early is that you also reduce the file size which makes further changes to the image run much faster since you are using less memory and disk space.
4. Learn to remove dust marks and blemishes – Use the Healing Brush and the Clone Stamp tools
Even with modern sensor cleaning built-in, you may find your image contains dust marks or other blemishes. These will often be seen in areas of smooth tone such as a clear sky. These should be removed using the Healing Brush tool, especially useful on smooth colour and tones like skies, and the Clone Stamp tool. The Clone Stamp tool is essential for removing or correcting areas of detail which the Healing Brush tool quite often just messes up. Get a grip on these two important tools quickly so you can really clean up your important images.
5. Learn to correct the tonal values – Use the Levels command
The next logical step is to correct any exposure problems or tonal range issues. If the picture is too dark or light now is the time to correct it. To do tonal corrections you need to learn to use the Levels command. The levels command uses a histogram to show the tones so your previous learning from Step 1 above will really help you now. I told you it was a logical learning sequence!
6. Learn to remove colour casts – Use the Colour Balance command
Although modern cameras make a reasonable job of interpreting the colour of light reaching the sensor, they also often get it wrong which results in a photo with an obvious dominant colour. This is known as a colour cast and needs to be removed using the Colour Balance command. Once a dominant colour has been corrected you are ready to make more creative colour enhancements if desired.
There you have the six most important things for a Photoshop beginner to learn. Each of these steps can be mastered quite quickly and the knowledge gained will provide a solid foundation for all your future Photoshop work; whether you just want to improve a family snap or produce an advanced special effects work of art.
About the Author
Now you can go on to quickly learn these amazing skills with my essential guide ‘Mastering Image Correction in Photoshop’ that you can find here http://zone2tone.co.uk/mail_list/?p=subscribe&id=1 and where you will also be able to receive a free video tutorial to get you started.Copyright (c) Les Meehan 2010

Thursday, April 8
Article from Picture Correct #1
Seriously, I find this article explain a lot on photography hence, I decided to share with you all about the Aperture and Shutter Priority. What does this use for and on what purpose? It had been explained as below.
Quoted by PictureCorrect
Please enjoy.
Quoted by PictureCorrect
Please enjoy.
Aperture and Shutter Priority Modes on Digital Cameras
Posted: 05 Apr 2010 05:04 PM PDT
Aperture and shutter speed settings can seem confusing for a new photographer. Luckily your semi-automatic settings, Aperture Priority and Shutter Priority, make them a little easier to understand. Do you know how to use them?
"Olympic Blue" captured by Mike Regan (Click Image to See More From Mike Regan)
Earlier SLR cameras (film) were fully manual. A photographer needed to understand aperture and shutter speed settings and know how to use them. Then came automatic modes, which let the camera do the thinking for you. This was (and still is) a fairly reliable way of getting a well-exposed picture, but it took creativity out of the hands of the photographer. As time went by, few people learned the manual skills. So as camera technology improved, the quality of most photos actually got worse.
Today we have the best of both worlds. All DSLR cameras and most compact digital cameras have manual and automatic modes, but they also offer semi-automatic modes. That means you can be a little creative, and still allow the camera to control the exposure for you.
If you have Aperture Priority and Shutter Priority on your camera, but never quite understood what they were for, this article is for you.
First up, what are Aperture and Shutter Speed? These are the two mechanisms for controlling the level of exposure in your photos; whether your photo will be overexposed, underexposed, or just right. To explain them properly would take a much more in-depth article, so here is just a quick run-down.
Aperture is the size of the hole that lets the light in on your photo. Think of it like the iris in your eye – as the light gets lower, you open the aperture to let more light in. Aperture also controls depth of field, which affects how much of your picture is in focus. When you have a small aperture, you have a large depth of field, so your subject and the surroundings may be in focus. When your aperture is wide, the depth of field is much smaller, so there is much less area around the subject that will be in focus.
"An Eye For You" captured by Brett W (Click Image to See More From Brett W)
Shutter speed is the duration of the exposure. The shutter must be open to allow the light in; therefore the longer it is open, the brighter the exposure will be. Shutter speed also controls how you capture movement in a photo. If you want to freeze a moving subject, you need to use a fast shutter speed.
The trick is to combine your aperture and shutter speed settings for the best result. If you get the balance right, your photo will be perfectly exposed, and you will have creative control over the look of the image.
Of course, this is easier said than done. To help you manage the challenge, you now have the option of Aperture and Shutter Priority. These semi-automatic modes allow you to take control of one setting, and the camera sets the other automatically. This lets you have some creative input, with the safety net of knowing the camera will take care of the level exposure. You decide how you want your photo to look, and the camera will make sure it is correctly exposed.

So which do you choose: Shutter Priority or Aperture Priority? Well, it’s all a matter of…priorities.
Remember that aperture controls depth of field. So if the range of focus is the critical element in your photo, choose aperture priority. You can set a small aperture to maximize the depth of field, or a large aperture to concentrate the focus on the subject. Either way, the camera will adjust the shutter speed to give you the best exposure.
Shutter speed controls movement in a photo. If controlling a moving subject is the critical aspect of your picture, choose shutter priority. This will allow you to set a fast shutter speed to freeze the moving subject, or a slow shutter speed to capture blurred motion. Whichever shutter speed you choose, the camera will take care of the aperture so your photo is correctly exposed.
"night traffic" captured by zuhair sait (Click Image to See More From zuhair sait)
So your choice of Aperture Priority or Shutter Priority depends on the type of subject you are shooting, and how you want it to look in the final photograph. It really is an ideal marriage of art and technology, allowing you to concentrate on your creative choice rather than on technical issues.
There is so much to this subject, a short article like this can only scratch the surface. However if you have been reading your camera manual and scratching your head (like many people do) this quick introduction in layman’s terms should help you to make some sense of Aperture and Shutter Priority.
Aperture, shutter speed, depth of field, wide-angle and telephoto lenses…all the essentials of good photography seem simple when they are explained in terms you can understand. Visit http://www.naturesimage.com.au and check out Andrew Goodall’s ebook “Photography in Plain English” to discover your own talent for photography. While you are there, subscribe to the online newsletter for even more tips…it’s free!


Thursday, March 25
All in one posting...
I love my Blackberry each and everyday!
I gotta thanks my pal, whom I just knew from HWZ, for telling me so much things regarding to BB.
Before I forget, do remember to set your apps usage data to TCP/IP if you had set to your BBoM previously. At least for this case, you are utilising the BBoM of 12GB given by Singtel fully. I just got to wait and see how much I have to pay this month. I dare to say my bill will be a littler high due to changes of plan recently. Let's finger cross about the additional charges.
Blackberry OS leaked had been spread around recently. You can find the information through CrackBerry and... just in case you want to be spoon fed, HERE/THERE you go! OS 5.0.0.566!
1. Always Backup your BB first.
2. Download the program on your PC
3. Run it
4. It will prompt you to restart your PC
5. After reboot, open your Desktop Manager with your BB9700 connected to it via USB
6. DM will detect new OS found
7. Run it.
8. Approximately 10min+ of installation.
9. After installing, do a pull battery as to restart your phone.
10. Congrats! You got a new OS leaked!
OK, here's some of the review of my own. You can choose to ignore if you think it is load of bullshit. I am not a real hardcore user of BB anyway.
After pulling of battery, the loading of BB is pretty fast as compared to the past. It took about 1min tho... For non BB user, do not be stunned as the old OS take longer than that.
Button and navigation seem very responsive.
Lock your phone on the top of the left corner and you will not see anything except black image. Locking and unlocking seem a lot of faster as well.
Font size bigger.
That's what I notice about the new OS and my friend agreed as well. For new firmware of BBM, it just does not work OTA! I guessed that they might have removed it! Sigh...
Anyway, do remember to do a backup of your BBM as they provide free usage for you. Luckily for that, I am able to retrieve back my BBM contacts!
Love my BB so much now! I shall wait for the new release of BBM anytime soon!
Introduction - Program
BTW, my mister nice guy coll, Jien, introduced me one good program on how to care your system.
Advance SystemCare PRO
Find it not bad and pretty easy to use, hence I decided to share it over here. It help you to clear and fix lots of things, especially the registry part. I guess that I might buy it since the cost is not that expensive, which I really need to care for my PC also.
Here's one great site I just found through SystemCare program.
FreeNew is great because in there, you can tick what you want to be in your system and with just one click, it will automatically downloading everything for you! Just imagine, you have 20 sites to go individually for downloading and that really caused a lot of your time. And for this, it will DO everything for you! Cool huh? Try it! You never know about it!
Worst Moment - Surprised!
OMG! Guess what? Just when I blogged about my camera issue, it.... suddenly revived!
Yah... How I wish there's sponsor knocking door on my email.
Alright, I was merely testing on my charger which I firmly feel that it should not give me any issue until I had my batteries charged for 2hrs and the other one for 1 whole night. I had the batteries slot in my 5D and I saw batteries icon showing 100% full! I was overwhelmed at that time and find out that the battery I used had been charged for 2hrs... and it is showing me no error! So, the main culprit = CHARGER! The full charged indicator bluff me through!
Ok, save the money of 3.7K for Canon 5D MKII at the moment! Phew... I thought of selling it off since there's no problem already but one of my pal suggested me to leave it as spare cam... which is very TRUE and agreeable!
Thanks to those who drop me a message about my camera fate... Appreciated.
Tuesday, March 23
One of my worst moment....
Yes... as my topic for this post mentioned....One of my worst moment
I was happily setting up my studio light, background paper, my new ring flash and camera so that I can take my happy little terror portfolio and something struck me by surprise!
Anyway, it isn't much of the sudden surprise I received because of the battery issue and it had been one of my phobia taking my Canon 5D out from the dry cabinet. As you read my blog post before, I did mentioned about the battery issue with my beloved Canon 5D and I had it send in 2 times before to Canon Service Center; the first time was changing of both motherboard on the camera body and vertical grip which cost me $400+ and the second time, they detect no issue and just a fast spring cleaning for me at no charge.
Placing the battery on my charger, it stated full. But when 3 x battery, 1 of them is original canon battery, were slot in the camera, it detected as batter flat and kept flashing non stop.
Hence, I decided to take out my vertical grip and test again.
Yes, it stated as empty as well despite having it charged fully. I gave a huge sigh and decided to pack up the things with my parents and wifey feeling utterly disappointed. No one dare to say anything because I was fuming mad towards this again and again situation.
I decided to have my battery charge for an hour to test if it will be charged fully or not.
But wait a second! Remember my dear O pal, Darrel? I borrowed his camera previously, swapped both batteries and it tested to work perfectly! So I have a feeling that it might not be the charger issue.
I was disheartened and what's going to happen for my photography path? Sideline? And model theme shoot coming up?!
Should I sell the entire stuff and give up? It's not going to be cheap if I am going to purchase one at this moment... family have to come first at this point of time. Unless I win toto...
No wonder Monkey will Po Chai this year... this is not the 2nd time I'm facing...
Wednesday, September 30
Just some camera and photoshop talks
Attention to LX 3 user out there.
Panasonic had suspended the link for upgrading of firmware to v2.0. Beats me what is going on. I suspect that there might be v2.01 coming out due to 'bugs' found on v2.0?
Let's just hang on and see what they have to offer. I hope they can resolve any issue before I left for Australia.
It is getting really close to my Low Key In-Camp Training which is just next week. I have prepared most of the items in a plastic bag. I got to make sure I get the new pair of boots during my ICT next week.
You know, I do really hope to have this:

Lovely, isn't it?
I am wondering if anyone dare to use Medium Format and TOSS! Do not say I am crazy about using camera to toss in the air. Apparently there are people did that! How fun it can be huh? But it might do harm to your camera having improper catching of it, mainly the lense.
Here, this is the flickr group. All about the tossing you can find there. I do not think I have the guts to toss my LX3 and 5D. Maybe my old P5100 Coolpix can do the job. The fear of it dropping on floor sucks!
And this is what I found on youtube if you want to learn more about photoshop. I am having fun by learning some tips and trick from the video.
Here's the preview for you
I hope to finish Sean and Rebecca ROM photos ASAP. Lots of Photoshop to be done. I want my client to feel happy with the outcome.
Panasonic had suspended the link for upgrading of firmware to v2.0. Beats me what is going on. I suspect that there might be v2.01 coming out due to 'bugs' found on v2.0?
Let's just hang on and see what they have to offer. I hope they can resolve any issue before I left for Australia.
It is getting really close to my Low Key In-Camp Training which is just next week. I have prepared most of the items in a plastic bag. I got to make sure I get the new pair of boots during my ICT next week.
You know, I do really hope to have this:
Lovely, isn't it?
I am wondering if anyone dare to use Medium Format and TOSS! Do not say I am crazy about using camera to toss in the air. Apparently there are people did that! How fun it can be huh? But it might do harm to your camera having improper catching of it, mainly the lense.
Here, this is the flickr group. All about the tossing you can find there. I do not think I have the guts to toss my LX3 and 5D. Maybe my old P5100 Coolpix can do the job. The fear of it dropping on floor sucks!
And this is what I found on youtube if you want to learn more about photoshop. I am having fun by learning some tips and trick from the video.
Here's the preview for you
I hope to finish Sean and Rebecca ROM photos ASAP. Lots of Photoshop to be done. I want my client to feel happy with the outcome.
Blogged with the Flock Browser
Monday, September 28
Panasonic LX 3 firmware upgrade
Panasonic LX3 just launch their latest verion 2.0 firmware.
Read more information from here: dPreview
Firmware download page. PDF on manual
I had just upgraded the LX3 firmware from v1.3 to v2.0. In fact it took less than 30sec! All the new program in the camera is terrific! Enable you to play around with WB is a bonus too! Not to forget about square format lookalike Medium Format 6x6 output!
Have fun! I shall shoot the square mode and upload tonight! Nice! Love your LX3! They rock!
Blogged with the Flock Browser
 Posted in: camera
Untitled
After the photoshoot with Cait, she left behind a wonderful liquid for me... which is on my background paper!

My darling baby pee on my background paper!

See it on the bottom? LOL.. The whole paper have to be cut off tho.
I am having some situation on my camera yesterday while shooting. In short to say, my CCD might be the issue because all images appear to have black gradient on the bottom of the photo. While on portrait, it will on the right side. I tried on C1Pro and preview images on camera, changed lense.. it still appear to give me this issue.
I shot without lense and everything is white, but once I attach the lense in and did swop it, I'm still facing the same problem. Weird, right? After I turn off and on for the third time, it appear to be ok once again! Luckily issue did not appear when I am doing the wedding ROM shoot last weekend!
I finally have time to do touch up on RAW photos. I am hoping to give the photos by 19th Oct!
Agar Agar mooncake!
This is done by wifey's coll's mom in Malaysia. Yummy and nice!

4 different agar agar moon cake
Brown - Chocolate
Pink - Red Bean
Purple - Yam
Yellow - Durian

Nice looking agargar mooncake

Redbean

Durian

Chocolate

Yam
My darling baby pee on my background paper!
See it on the bottom? LOL.. The whole paper have to be cut off tho.
I am having some situation on my camera yesterday while shooting. In short to say, my CCD might be the issue because all images appear to have black gradient on the bottom of the photo. While on portrait, it will on the right side. I tried on C1Pro and preview images on camera, changed lense.. it still appear to give me this issue.
I shot without lense and everything is white, but once I attach the lense in and did swop it, I'm still facing the same problem. Weird, right? After I turn off and on for the third time, it appear to be ok once again! Luckily issue did not appear when I am doing the wedding ROM shoot last weekend!
I finally have time to do touch up on RAW photos. I am hoping to give the photos by 19th Oct!
Agar Agar mooncake!
This is done by wifey's coll's mom in Malaysia. Yummy and nice!
4 different agar agar moon cake
Brown - Chocolate
Pink - Red Bean
Purple - Yam
Yellow - Durian
Nice looking agargar mooncake
Redbean
Durian
Chocolate
Yam
Blogged with the Flock Browser
Monday, September 7
Seem cool with the cushionspeaker laptop stand
Wise to use at home when you sitting at a corner nearby the window while enjoying your favourite internet radio station either blogging, e-mailing, reading something or even chatting. Most importantly, it does not really 'burn' your leg because of the heat from the laptop.

via engadget (Philips CushionSpeaker)
And one more to share.
Samsung's LED TV Couple packs a 7" tablet remote for streaming.
You heard about my posting regarding about network media tank and so forth, this will be another great stuff to do streaming!

Ok, I personally think that it does not have any DTS involve too. So when you go by streaming, nothing can be encode/decode the audio for you unless the source is plugged to your amp. (I reckon)
But then again, this is another cool and powerful thing from Samsung. They never fail to produce interesting technology.
Something I do not like personally will be their ST550. Having both back and front playback image? That's weird! But innovative huh!

via dpreview
Somehow, what you love most will always be: HD video recording.
via engadget (Philips CushionSpeaker)
And one more to share.
Samsung's LED TV Couple packs a 7" tablet remote for streaming.
You heard about my posting regarding about network media tank and so forth, this will be another great stuff to do streaming!
Ok, I personally think that it does not have any DTS involve too. So when you go by streaming, nothing can be encode/decode the audio for you unless the source is plugged to your amp. (I reckon)
But then again, this is another cool and powerful thing from Samsung. They never fail to produce interesting technology.
Something I do not like personally will be their ST550. Having both back and front playback image? That's weird! But innovative huh!
via dpreview
Somehow, what you love most will always be: HD video recording.
Blogged with the Flock Browser

via Hotware
I hope they get the final product out soon. On the 2nd thought, who is willingly to buy this?
I agreed with Marc Levoy (Professor) about the megapixel wars.
Read more here
Blogged with the Flock Browser
Sunday, June 14
Spend and more knowledge
I am still unable to solve why I cannot connect my NMT wireless to my router. WEP key, IP add, subnet, gateway and DNS had been key in manually for 5times, but still no happy screen shown when I click onto Internet Radio. However, I went to Funan after I had finished recording during noon time to get my Lan cable since Alex Wong told me to try using that.
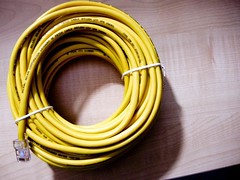
Gotten this Belkin LAN cable of 15.2m from Challenger to test my router to my NMT. Yes, it works!
I also managed to find DI.FM internet radio by searching under Country. I had no idea if I can save the radio station because I do not want to find that particular channel by clicking next for 10 times! But at the same time, I think I should get myself a small mini hi-fi, so that I can inset analog left and right to it on Aux. I am able to enjoy my internet music whole night by doing that. A small will do tho. But I need to solve the wireless first as laying the cable on the floor is quite untidy and dangerous because we still have to attend to cait in the middle of night.

Initially I wanted to get myself 2 x Canon Original 5D batts, but a pity that CP do not have stock anymore. Hence, I made a trip to The Camera Work Shop and gotten this instead.
$25 each, comparing to about $100 for a batt. The boss suggested me to use this instead and I shall give a try later on as I am charging it.
I saved even more this time round. Let's hope this Divipower is better than the wonder Camera Device batt. Finger cross! I am hoping that I will not face the camera go low batt!

Thermometer set given by the office to ensure everyone measure their temperature in the morning before heading to work. If you are sick, please kindly stay home, thank you.
Wifey and me are starting to think of some ideas to shoot our princess, so I need to gather some baby photos to create some interesting shot which not a lot of photographer did before. Some of the mummies wanted me to do it, but as wifey thought that same as me, she told them that, let's look at the photo first before deciding. Best of all, it will be great to understand what kinda feel and mood the parents want to have their own personalise theme. I am open to ideas.
I am interested in getting the power conditioner for the system protection.

This is consider a little expensive. Around $120++. G&W from HK.

I do not mind buying this Tacima at $90.

This RCA cap cover by leGO is meant to protect the RCA from oxidising.

This is how it look. $33 for 100 pcs.
Kinda weird that my SCV digital setup box went dead earlier on. No power at all! Look like I have to make a trip down to Starhub to get it change, but at the same time, I am considering if I should get the HD Hubstation also. I have to justify IF my parent will do recording for the shows or not. After typing this, it seem to be zero and I shall have it until I move in to the new house.
Both wifey and I have a lot of place to run later on (noon), and hope that everything will be done up asap. So that I can enjoy the movie at night, as well as setting up the jukebox too.
I am considering if I should install the Jukebox as I am going to get a lot of movies, and each time I watched, I will delete it off unless it is one of my favourite movie too. Right now, I am able to get my collectorz done but I am stuck at the username and password because I have no idea for that at all. I have not jot down how many movies I have in NMT and get the name of the movies on collectorz so that I can export the information to the NMT. But then again, where does the information goes to is another question for me again! Though it is a little confusing here and there, but I am happy to do it and crack my brain by solving it! Fun and interesting!
Oh. This is one interesting site that I gotten. It is meant to fix and merge the m2ts files after getting your stuff. I had a few of the movies in that format and having over 20 separate files, having some of it in small size and one of it been at least 4 gb and above, which I firmly think it is the correct file to playback that.
I had not set up MyiHome yet, if not I can view my rmvb on TV tomorrow thru that!
Gotten this Belkin LAN cable of 15.2m from Challenger to test my router to my NMT. Yes, it works!
I also managed to find DI.FM internet radio by searching under Country. I had no idea if I can save the radio station because I do not want to find that particular channel by clicking next for 10 times! But at the same time, I think I should get myself a small mini hi-fi, so that I can inset analog left and right to it on Aux. I am able to enjoy my internet music whole night by doing that. A small will do tho. But I need to solve the wireless first as laying the cable on the floor is quite untidy and dangerous because we still have to attend to cait in the middle of night.
Initially I wanted to get myself 2 x Canon Original 5D batts, but a pity that CP do not have stock anymore. Hence, I made a trip to The Camera Work Shop and gotten this instead.
$25 each, comparing to about $100 for a batt. The boss suggested me to use this instead and I shall give a try later on as I am charging it.
I saved even more this time round. Let's hope this Divipower is better than the wonder Camera Device batt. Finger cross! I am hoping that I will not face the camera go low batt!
Thermometer set given by the office to ensure everyone measure their temperature in the morning before heading to work. If you are sick, please kindly stay home, thank you.
Wifey and me are starting to think of some ideas to shoot our princess, so I need to gather some baby photos to create some interesting shot which not a lot of photographer did before. Some of the mummies wanted me to do it, but as wifey thought that same as me, she told them that, let's look at the photo first before deciding. Best of all, it will be great to understand what kinda feel and mood the parents want to have their own personalise theme. I am open to ideas.
I am interested in getting the power conditioner for the system protection.
This is consider a little expensive. Around $120++. G&W from HK.
I do not mind buying this Tacima at $90.
This RCA cap cover by leGO is meant to protect the RCA from oxidising.
This is how it look. $33 for 100 pcs.
Kinda weird that my SCV digital setup box went dead earlier on. No power at all! Look like I have to make a trip down to Starhub to get it change, but at the same time, I am considering if I should get the HD Hubstation also. I have to justify IF my parent will do recording for the shows or not. After typing this, it seem to be zero and I shall have it until I move in to the new house.
Both wifey and I have a lot of place to run later on (noon), and hope that everything will be done up asap. So that I can enjoy the movie at night, as well as setting up the jukebox too.
I am considering if I should install the Jukebox as I am going to get a lot of movies, and each time I watched, I will delete it off unless it is one of my favourite movie too. Right now, I am able to get my collectorz done but I am stuck at the username and password because I have no idea for that at all. I have not jot down how many movies I have in NMT and get the name of the movies on collectorz so that I can export the information to the NMT. But then again, where does the information goes to is another question for me again! Though it is a little confusing here and there, but I am happy to do it and crack my brain by solving it! Fun and interesting!
Oh. This is one interesting site that I gotten. It is meant to fix and merge the m2ts files after getting your stuff. I had a few of the movies in that format and having over 20 separate files, having some of it in small size and one of it been at least 4 gb and above, which I firmly think it is the correct file to playback that.
I had not set up MyiHome yet, if not I can view my rmvb on TV tomorrow thru that!